Monthly Archives: November 2012

I <3 Wood Stoves

First, let me give you a little background on my love for burning wood (although, really — who doesn’t like burning stuff?). I grew up in a 200 year old house that had 6 fireplaces (for a modestly sized 4 bedroom house). Two of those were large cooking fireplaces, like this (although ours were nicer, in my opinion):

Cooking fireplace

Cooking fireplace

Even though most of our fireplaces were usually not in use, I still have a soft spot for a nice wood-burning fireplace.

Alex and I don’t have any fireplaces in our house. I guess it makes sense — the house was built in 1900 so it came into existence when central heating was around in the form of radiators and furnaces. But we do have two chimneys, for venting the original furnace and/or water boiler. One of those chimneys is currently used for our oil-fired forced-air heating system (as well as for our neighbors’, as it’s a shared chimney). The other chimney was ruined by an idiot and some concrete, as I mentioned before.

I was never crazy enough to think about tapping into one of those chimneys for a fireplace (the logistics of where to put it being the biggest issue), but I was [am?] crazy enough to want to use one for a wood stove: All of the awesomeness of a fireplace, none of the hassle of actually installing a fireplace.

How great are these:

https://i0.wp.com/vermontcastings.com/wp-content/themes/vermontcastings/images/gallery/Stoves/VC_WB_Defiant_iStock_000007154043XLarge.jpg


Jotul wood stove

Jotul wood stove


And I’m crazy about this one, but sadly it’s a Danish company (I’ve found that most of my favorite style stoves come from the Danish — they must know what they’re doing when it comes to wood stoves). I don’t think I could convince anyone to ship it to me in the US:

Westfire Uniq 5 Wood Stove

Westfire Uniq 5 Wood Stove

I think this one is available in the US, and it’s got a  similar clean & contemporary shape:

Morso 3440 Wood Burning Stove

Morso 3440 Wood Burning Stove

But all of this daydreaming is probably for nothing. While the stoves themselves are pricey (and I’d be willing to pay for one), the cost to install it is insane.

Since the discovery of our “dormant” chimney (the contractor’s polite way of referring to our ruined chimney), here are the only stove choices we have:

  1. Wood Stove — would require the installation of a full metal chimney outside of the house, which must reach several feet above the top of the roof line. Since we have a three story house, we’re talking about 30+ feet of chimney, and in the neighborhood of $3,000 – $5,000 to have it installed (on top of the $1,000 to $4,000 cost of the stove itself). Ouch. Although the stove guy did say we could technically install this ourselves if we wanted, code requirements and the sheer cost of materials, which aren’t really marked up that much, make that a not feasible option. (Although I do appreciate his faith in my chimney-installing abilities)
  2. Pellet Stove — only requires a direct vent to outside, which must be at least 7 feet above any place where a person would walk. Since our first floor is about a half-story above ground level, we can pretty much vent a pellet stove straight outside if it’s on the first floor. Plus, this would only cost about $600 – $800 to have installed (on top of the cost of the stove). But while I recognize the eco-friendly-ness of pellet stoves, and appreciate the cost savings of installation, I’m just not into this idea. Yes, you can still watch a “fire”, but you’re limited to only one fuel (pellets), and it’s really more of a furnace than a fireplace, requiring electricity to run (not very useful for heat in a power outage)
  3. Gas fireplace/stove — We have a gas line into the house already, so we’re set. It’s clean, it’s cheap fuel, it doesn’t require electricity to run, etc – all very real plus sides. But no way. The stove-store guy was a little taken aback by my vehement reaction to his gas stove suggestion — if I’m going to pay for gas heat in my house, it’s going to be in the form of a new gas-fired forced air furnace, not a stupid, fake gas fireplace. (I apologize if you like gas fireplaces, but I’m just not into them — too fake and sterile. I don’t like the idea of lighting a fire by pushing a remote.)

The bottom line is that I don’t have thousands of dollars lying around for this project (sadly), so it’s going to have to be tabled indefinitely. But at least I have a realistic idea of how much money I’d have to save up to do this. I would love to have an alternative heat source to the oil furnace (especially after we just got the $600 bill to top off the fuel tank, which will last us only a month or two), but realistically a stove of any kind won’t be enough to heat the entire house, since we’ve got three floors.

So while I want one, the rational part of me says “If it costs $5,000 for a wood stove which is really more for aesthetics than heat, you’re better off putting that money into a natural gas-fired furnace, which will go a lot further to reducing heating costs”. And this is a true statement. But I don’t like putting my money into things I can’t see (I don’t often go into the basement to gaze lovingly at my furnace). And, to reiterate — I don’t have that kind of money lying around anyway.

Which means this is just a pipe dream, at least for now …

Tagged , , ,

Update on the "Mold" aka efflorescence situation

I don’t have any photos or exciting updates lately, although that doesn’t mean that nothing has been going on with the house …

So way back in the day, we discovered mold in our 3rd floor bedroom. And then shortly thereafter, we discovered that it was not, in fact, mold. It was efflorescence. Which seems like a win, until you piece together the obvious conclusion — this means water infiltration.

We had several contractors come through to take a look at it — at least one roofer and two masons. And the responses we got back said, generally speaking — there’s nothing wrong with the masonry, and our roof probably isn’t leaking.

But we noticed the efflorescence popping up on the bottom floor of the house, directly underneath the probably-not-leaking-but-must-be-leaking spot on the third floor. And decided it was finally time to address the issue (it only took us a year to get around to it … not bad. I’ll give myself a pat on the back for this one).

To take care of this work, we (fortunately) found a great mason. After checking out a few contractors, we settled on one we trusted, was straightforward with us, and (hallelujah!) was honest about what parts we could DIY / address ourselves to save money (such as patching the hole in the 3rd floor bedroom, a job that most others wanted to do for us, and charge us for). His name is Kyle and his company is LB Masonry, in case you’re in the market for masonry in the greater Philadelphia area.

The good news was that, on the whole, the brickwork on our house was in great condition (especially great as it’s 112 years old). According to Kyle’s survey, there were a few places that needed to be re-pointed, and the chimney on the probably-actually-leaking side of the house needed to have the flashing correctly installed. So that’s what we contracted for.

But of course things don’t always go according to plan.

The bad news is what he found while up there: first, the roof on the front side of the house is at it’s need-to-be-replaced stage. There was also a section above one of the dormers that was just flat-out missing some shingles. I want to believe that this was a result of the recent hurricane that hit the East Coast, but I suspect that it’s been an issue for longer, given obvious signs of water infiltration on the inside of the house. Which aggravates me because we’ve had others up on the roof recently, and they just apparently didn’t notice the issue. And I would like to take a moment to point something out — the back half of our house has a slate roof which is original to the house (i.e. 112 years old). The front side has an asphalt shingle roof that is maybe a decade or two old. One of those sides needs to be replaced, and I’ll give you a hint — it’s not the 112-year-old side. So if you have an awesome slate roof, do the right thing and replace the one or two broken pieces each year (for only ~$100) instead of letting it get bad and then tearing it all out to put asphalt in. It makes me sad that someone did that to our house.

The second bit of bad news regards the chimney. We have two chimneys; one is used to vent our oil furnace (as well as the attached house’s furnace), the other is, as far as we could tell, not being used. We’ve been eyeing it for the installation of a wood stove. But those hopes were dashed when Kyle came down (with photos, which I appreciate, ’cause I am not ready to climb up on my own roof) to tell me that some idiot (er… former occupant) poured concrete in the chimney. Yes. Concrete. Into the chimney. For no discernible reason (if you just wanted to seal it off, it is both cheaper and more effective to just put a steel plate on top).  There’s no way to know if the whole chimney is filled or if the concrete is only a few inches/feet thick without tearing it to pieces (since we don’t have any fireplaces to poke around in). No matter what, to reverse it would cost big bucks, and would require the complete removal and re-installation of the chimney. Which doesn’t really fit into my master plan or budget. But beyond the irreversibility of this “fix”, it also made a nice little swimming pool in my roof — water just collected there and sat on top of the concrete, eventually absorbing through the brickwork. Ah — I think we finally found the actual source of the water infiltration in my probably-not-leaking roof (I guess we could honestly say that the roof was not technically leaking, because it was actually the chimney-turned-cistern). To fix this, we (or actually Kyle and his partner) sealed off the chimney with a metal plate, just like the concrete-wielding former owner should have done to begin with.

So while I’m still clearly steaming a little bit about the chimney situation (but seriously – what kind of jackass would do that? it makes no sense!), I am happy to report that we’re leak-free. Which means we can start patching up the various cracks and holes caused by water damage and our mold-hunting-escapade.

Tagged , , ,

Update on the “Mold” aka efflorescence situation

I don’t have any photos or exciting updates lately, although that doesn’t mean that nothing has been going on with the house …

So way back in the day, we discovered mold in our 3rd floor bedroom. And then shortly thereafter, we discovered that it was not, in fact, mold. It was efflorescence. Which seems like a win, until you piece together the obvious conclusion — this means water infiltration.

We had several contractors come through to take a look at it — at least one roofer and two masons. And the responses we got back said, generally speaking — there’s nothing wrong with the masonry, and our roof probably isn’t leaking.

But we noticed the efflorescence popping up on the bottom floor of the house, directly underneath the probably-not-leaking-but-must-be-leaking spot on the third floor. And decided it was finally time to address the issue (it only took us a year to get around to it … not bad. I’ll give myself a pat on the back for this one).

To take care of this work, we (fortunately) found a great mason. After checking out a few contractors, we settled on one we trusted, was straightforward with us, and (hallelujah!) was honest about what parts we could DIY / address ourselves to save money (such as patching the hole in the 3rd floor bedroom, a job that most others wanted to do for us, and charge us for). His name is Kyle and his company is LB Masonry, in case you’re in the market for masonry in the greater Philadelphia area.

The good news was that, on the whole, the brickwork on our house was in great condition (especially great as it’s 112 years old). According to Kyle’s survey, there were a few places that needed to be re-pointed, and the chimney on the probably-actually-leaking side of the house needed to have the flashing correctly installed. So that’s what we contracted for.

But of course things don’t always go according to plan.

The bad news is what he found while up there: first, the roof on the front side of the house is at it’s need-to-be-replaced stage. There was also a section above one of the dormers that was just flat-out missing some shingles. I want to believe that this was a result of the recent hurricane that hit the East Coast, but I suspect that it’s been an issue for longer, given obvious signs of water infiltration on the inside of the house. Which aggravates me because we’ve had others up on the roof recently, and they just apparently didn’t notice the issue. And I would like to take a moment to point something out — the back half of our house has a slate roof which is original to the house (i.e. 112 years old). The front side has an asphalt shingle roof that is maybe a decade or two old. One of those sides needs to be replaced, and I’ll give you a hint — it’s not the 112-year-old side. So if you have an awesome slate roof, do the right thing and replace the one or two broken pieces each year (for only ~$100) instead of letting it get bad and then tearing it all out to put asphalt in. It makes me sad that someone did that to our house.

The second bit of bad news regards the chimney. We have two chimneys; one is used to vent our oil furnace (as well as the attached house’s furnace), the other is, as far as we could tell, not being used. We’ve been eyeing it for the installation of a wood stove. But those hopes were dashed when Kyle came down (with photos, which I appreciate, ’cause I am not ready to climb up on my own roof) to tell me that some idiot (er… former occupant) poured concrete in the chimney. Yes. Concrete. Into the chimney. For no discernible reason (if you just wanted to seal it off, it is both cheaper and more effective to just put a steel plate on top).  There’s no way to know if the whole chimney is filled or if the concrete is only a few inches/feet thick without tearing it to pieces (since we don’t have any fireplaces to poke around in). No matter what, to reverse it would cost big bucks, and would require the complete removal and re-installation of the chimney. Which doesn’t really fit into my master plan or budget. But beyond the irreversibility of this “fix”, it also made a nice little swimming pool in my roof — water just collected there and sat on top of the concrete, eventually absorbing through the brickwork. Ah — I think we finally found the actual source of the water infiltration in my probably-not-leaking roof (I guess we could honestly say that the roof was not technically leaking, because it was actually the chimney-turned-cistern). To fix this, we (or actually Kyle and his partner) sealed off the chimney with a metal plate, just like the concrete-wielding former owner should have done to begin with.

So while I’m still clearly steaming a little bit about the chimney situation (but seriously – what kind of jackass would do that? it makes no sense!), I am happy to report that we’re leak-free. Which means we can start patching up the various cracks and holes caused by water damage and our mold-hunting-escapade.

Tagged , , ,

Happy Thanksgiving!

No new projects to share since there hasn’t been much home-improving time the last two weeks, but I do have something to be thankful for: a husband who really knows me.

We were driving around, listening to the radio, when a generic jewelry-store commercial came on, with a message for the dudes:

This year, get your special someone what she really wants for Christmas

And without missing a beat, Alex blurts out “A Kreg Jig!”

I missed the part of the commercial where they tell me what type of jewelry I really wanted, since I was laughing so much. But I was happy to know that Alex does know what I really want — more tools.

I hope everyone else is enjoying their Thanksgiving, and have much to be thankful for!

Upgrade for our pooches

We are on a furniture-building rampage! After the success of our dining room table, we have been looking around the house for anything else we can build. I feel like every nook of our house could soon be filled with handbuilt furniture. Just because we can.

So the next project was inspired by this photo, from a “doggie” themed sale at Joss & Main:

Oh la la. Very swanky. And even on sale it’s $450 (and that’s for the small size!). I love my dogs, but I don’t think they’d appreciate a fancy $450 crate. Plus I have two dogs, so that means nearly $1,000 for nice wood crates. Not happening. But it would be nice to have something better looking than the standard plastic crates we use now — the dogs like to hang out in their crates, but we don’t like to have the ugly plastic crates front-and-center in our house. So they get relegated to the basement, which makes the dogs sad.

So of course I popped over to my favorite furniture plan site, www.ana-white.com and hoped she had a plan for a dog crate — success, she did! Man, I love that website. The only issue was that her plan was for a very large crate, so with a mini dachshund and some type of terrier mutt, we had to scale down the measurements a bit.

There are only so many ways I can show measuring, sawing, and joining (steps which are better illustrated on Ana’s site, anyway), so I’m going to skip right to the good stuff:

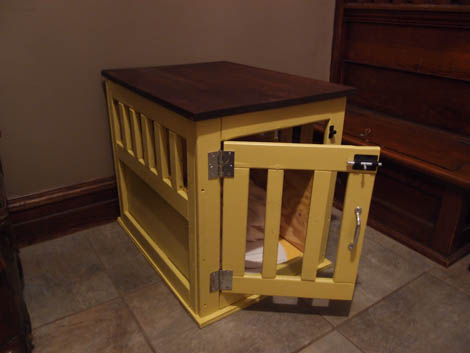
Here are some pieces (sides and back), ready to be assembled into the final crate:

And here’s the (unfinished) crate. BAM, instant doggie home!

I wanted to stain them a dark mocha color, to make them look a little richer. Fortunately, we had some “Java” gel stain leftover from our gel-staining oak cabinets project. Unfortunately, we were using very, very, very poor quality wood, and it did NOT take the stain well. Only the top of the crate was made with “stain grade” wood, so we stained that part and decided to paint the rest.

After weighing the pros and cons of painting it a wood color, I decided that if I was going to paint it, I might as well paint it a nice bright color. There really isn’t much logic there, it’s just what I was feeling at that moment. And I was also feeling lazy, so I went with spray paint.

I gave it two coats of what I’d hoped would be a nice sunny yellow (and I would have needed at least 2-3 more to get full coverage), before declaring it a bust.

Since I was already down the painting rabbit-hole, I looked around in my basement and came upon a $3 tester of an avocado-y green color. What did I have to lose? Just a bit of time. Fortunately, attempt number three was just the ticket — I was happy with the less-obnoxious color, but still got a bit of brightness that I wanted.

And Madison seems to be ok with it, too. (We also made a second one for Alex the dachshund)

Tagged , , , ,

New Dining Room Chairs

No, sadly this isn’t a “reveal” of how I finished reupholstering all of my dining room chairs. I still have yet to make it past the first one, and since I was out of town for work last week, I didn’t get much done in the way of dining room progress. Other than daydreaming about what I’d like the dining room to look like, and specifically about what chairs to pair with my homemade farmhouse style dining room table.

So I do like the newly-reupholstered-but-old chairs. And since I already bought all of the fabric, I will eventually go down the road of upholstering them all. Emphasis on “eventually”.

But I’m kinda obsessed with the Pauchard-inspired metal French bistro style chairs. Like this one, from Industry West, which comes in a rainbow of colors (I’m partial to this blue):

*Disclaimer: None of these photos are mine, but as always, I link back to the source on all of them. 

Or this one, from Restoration Hardware (why do I love their furniture so much?):

I think the contrast of the wood farmhouse table vs. industrial metal chairs could look cool, like the pictures below:

Or how about this one:

I don’t really need new chairs. And I do genuinely like the ones that I have, although they’ll get put to use no matter what (they are currently residing in various places around the house, as desk chairs or extra seating). As always I’m trying to stay away from going too “country” or too “historic” in my decor, hence the contrasting pieces where possible. Plus, let’s be real — I just like those chairs, and am looking for a way to incorporate them.

No idea what I’ll end up doing, just thought I’d put the idea out there … thoughts?

Tagged , , , ,

MORE Homemade Furniture

So after building our own dining room table out of necessity (and curiosity as to whether or not we could do it), Alex and I are pretty into furniture building. Having a copy of Ana White’s Handbuilt Home doesn’t hurt, either, since we can easily flip through the book and say … “yeah, this looks good. Let’s build this.”

Next on our agenda was filling an annoyingly wasted space in the kitchen — a little nook across from the basement door that is about 15 inches deep. Since we’ve moved in, we’ve looked at that spot thinking “It would be great to have more storage over there — a table, shelves, anything”, but we couldn’t find something to fit in the spot.

So, here’s me stating the obvious:  the best part about building your own furniture is that you can make it whatever dimensions you want!

I was out of town for the weekend, and Alex decided to use one of Ana White’s plans to make a console table to fit in that corner.   Since the professional photographer of the house was away, the best Alex could do was…use his cell phone.  On the plus side, the camera is pretty decent!  On the minus side, it’s not the real camera!

The wood for the console post-cut and pre-assemble. Hard to believe this pile of wood will become a table!

The wood for the console post-cut and pre-assemble. Hard to believe this pile of wood will become a table!

The skeleton has come together!

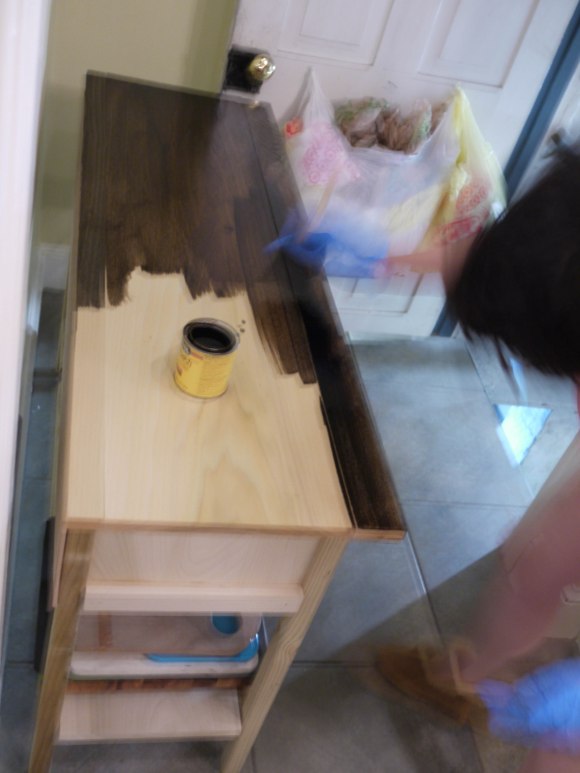
This is to prove that I am lightning-fast at staining! Just a blur of motion. 

Here is the table in a partially-complete state, with the top stained and unfinished drawers:

And here is the final result:

I love the Greek-blue color, which we picked to match the fabric for a faux-Roman Shade that I’ll eventually get around to making.

The best part is that now we have a place for our coffee maker, cutting boards, and toaster oven, freeing up precious counter space. As you can see in the photo, the drawers aren’t flush with the front of the console — this isn’t a problem with the design, but with the available supplies. We couldn’t find a 12″ drawer slide at Lowe’s or Home Depot — the smallest was 14″. So we went with the too-long version for now, which makes the drawer faces stick out. Eventually we’ll order the correct 12″ versions online … just add that to our very long “we’ll get around to this” list.

Tagged , , , ,

Rehabbing Dining Room Chairs

So even though my refinishing of a dining room table was a bust, I wasn’t ready to give up on the dream of Restoration Hardware-inspired dining room pieces.

We tried our hands at stripping the table, and that didn’t work. So we built a new table. But we did still need chairs, and we had the matching upholstered chairs just asking for a makeover. Much like our inspiration for the original table, we wanted our chairs to look something like this:

Photo from Restoration Hardware, Vintage French Round Upholstered Dining Chair

But this time, we weren’t going to try stripping the wood — we were just going to paint it (even though that wouldn’t look quite the same). Then, with some new fabric, we reckoned that the chairs would be close to our inspiration.

Here was our starting point. Not bad for a general match to the RH inspiration, right? At least in terms of shape.

I went out and got fabric – I went with a natural colored linen to match the inspiration, and sprung for actual linen, rather than cheaper “linen look” alternatives.

Then I flipped the chair over, expecting to unscrew the seat so I could staple the new material right over top of the existing fabric – easy. I figured I could knock out this project in a few minutes, tops. But of  course I encountered an unforeseen obstacle (just like with the matching dining table) — the chair was not a simple wooden seat with foam and fabric on top. There were springs and burlap and a fabric stapled directly to the frame. *Sigh*.

So here were the three paths I could choose (in my mind):

  1. Go ahead and try to reupholster it the “right” way — but this would require much more skill than I think I have. And probably getting piping to cover up the staples. I don’t know how to do that.
  2. Take it to an upholstery shop and have them do it for me — this would require more money than I was willing to spend.
  3. Take the current spring / burlap / padding / fabric out, and create a wooden seat with foam that I could staple to — this will require spending more money (on the wood and foam), and may not end up looking nice.

I guess there could be a fourth option — abandon this project — but I really need some dining chairs, and I already got the fabric. Yes, that’s a sunk cost and shouldn’t factor into my decision, but still….

In a surprise twist ending, I decided to go with option #1. I say that’s a surprise because I am usually the path-of-least-resistance person (or “lazy” as others might call it). But I figured I had nothing to lose from properly restoring it. If I botched the job, I could always take the whole seat apart and move on to option #3.

After a lot of googling around for “dining chair reupholstering”, I settled on the following method:

Step 1: Remove the current fabric

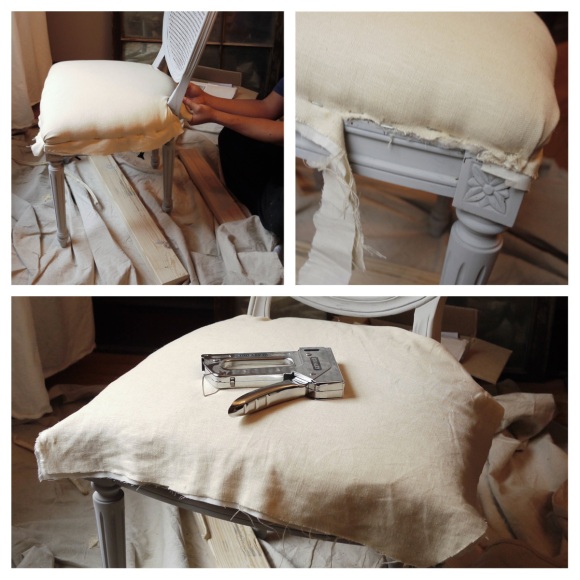
First, I tried pulling the piping / cording (what’s the proper name?), and discovered it was glued onto the fabric. But with gentle tugging, it came off. Then I used pliers, my hands, and brute force to remove the fabric from the seat, which was stapled all the way around. Honestly, I ended up ripping the fabric more than removing all of the staples, but in the end I was happy about that, since the burlap, padding, and cotton of the seat was in good enough shape that I wanted to preserve all of it. Removing the staples would have meant putting that all back together, too.

I saved the intact seat fabric to use as a template for cutting my new fabric.

Step 2: Paint the frame

After an unsuccessful attempt at stripping and refinishing the dining table, we took the easy way out and painted the chair. I chose Annie Sloan’s Chalk Paint in Paris Gray, because I had it on hand, and I wanted to go for a grayish-wood, french-country-cottage look. Also, I knew I could water it down to do a thinner, more wash-like coat.

The coat is mostly solid, and I will probably go back and distress the finish with sandpaper a bit, so some of the wood color shows through.

Step 3: Reupholster

We used a natural-colored linen, with a layer of muslin underneath (since the linen is thin and has a somewhat loose weave, but it’s expensive enough that we didn’t want to double up on the linen).

As for how we attached it — it was basically pull & staple, pull & staple, pull & staple. It was all-hands-on-deck, so one of us pulled the fabric taut while the other stapled into the seat frame with the staple gun. We did a few key points around the chair, then went back and stapled down the rest.

After enough staples were in, we simply cut off the excess fabric, right underneath the staple line. In theory this will get covered up with matching piping, but I don’t know how to do that (yet), so for now we’re going to leave it in it’s unfinished … er… rustic state.

Whew! One chair down, 5 more to go …

Also, the dogs seem to like it (but then, they liked it before, too). Any place they can sit and make sure we’re looking at them is good in their book.

Tagged , , ,

Building a Dining Room Table

So we mentioned how we botched a would-be rehabilitation of our former dining room table. And while we certainly plan on seeing that project through (we’re not giving up totally), because of previously made plans we DID need a functional, aesthetically pleasing table to use in two weeks, which is how I convinced Alex that we should build our own.

He was not really down with this idea. Or, in fairness, he was ok with it … eventually. But he didn’t want to do it RIGHT NOW, like I did. To put this in perspective — I came home from work Friday night with the stripper to use on our old table. Friday around 9pm we declared the stripping project a bust. Then, around 10pm, I said “We should build our own table this weekend”. I got a lot of eye rolls and groans, and more than one “Seriously? I just want a break”.

So when Alex called me on his way home from Saturday morning basketball only to find out that I was on my way home from the lumber store, he just resigned himself to the fact that it was happening.

First, I got the lumber. I chose poplar because it’s a softer wood, but still better quality than the pine / fir you can get from big box stores. That wood is  fine for framing and other purposes, but for building furniture, I wanted something a bit nicer (although I knew with my skill level, I wasn’t ready to graduate to oak, mahogany, cherry, walnut …. etc)

Because I was getting it from a lumber / specialty wood store, and NOT a Lowe’s or Home Depot, many of the boards didn’t come planed and in standard sizes. The pros of this included the ability to make the table a little more “rustic” (especially the planks on the top), but the biggest con was that we had to cut our own boards, which is a bit daunting. Also, the boards weren’t completely straight, again because they didn’t come planed. And not-straight boards usually makes not-straight furniture & joints. So that was tricky.

For a plan, I used some tips from both Ana White‘s book (The Handbuilt Home, “Farmhouse Dining Table” plan), as well as some parts from another table plan I found on her website. Basically I mixed and matched design components until I came up with something that would work with the boards that I had. In the end, it most resembled this design from Ana White’s plan catalog.

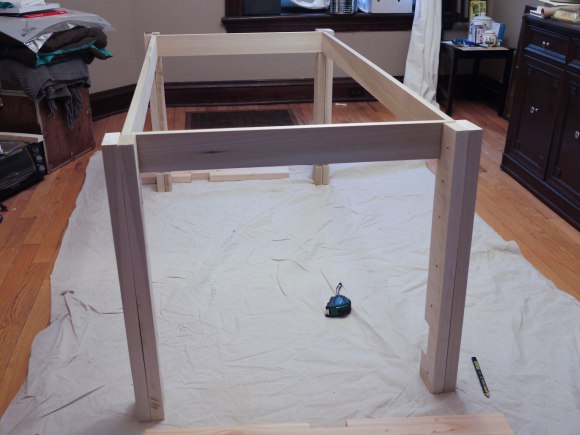
First, (well, second — first we cut all of our boards) we built the legs, which were two sections of 2×4 screwed & glued together, with strategic notches for the apron / frame and stretchers. We let them dry overnight (so the glue would make them nice and strong).

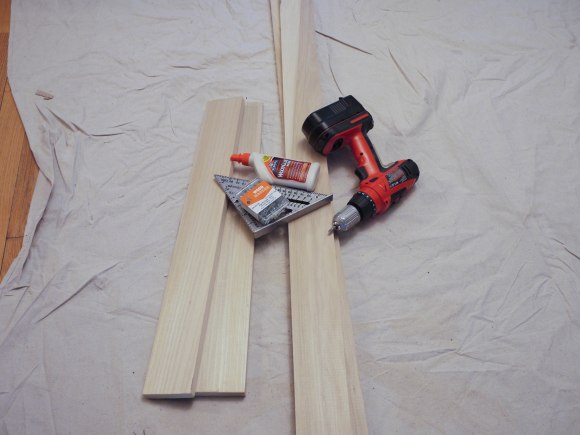
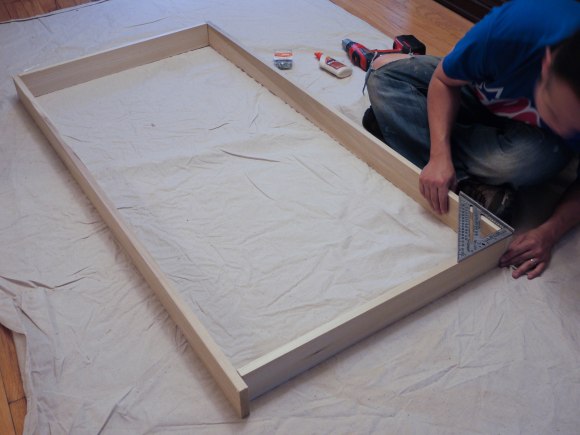
Then, the next morning we put the apron / frame together – this part would sit in the notches on the legs, and form the frame for the tabletop. All it took was a speed square to make sure things were lining up, some glue, and four screws … and bam! It’s starting to look more table-like.

From here on out it was pretty smooth sailing — just a matter of screwing all of the pieces together; it wasn’t much more complicated than assembling some Ikea furniture (but we had to pre-drill our own holes). We attached the side strechers (those little ankle height pieces between the end legs), which had a notch for a length-wise stretcher.

I put in the frame supports for the tabletop, and then climbed on top of it to make sure it was structurally sound (check! it worked).

And finally, we attached the four wide tabletop planks together via pocket holes (no picture of this, we needed all of our hands) and a sweet Kreg jig, and it was a simple matter of screwing the tabletop down.

Voila! Table in 1.5 days.

The bottom stretcher looks crooked in this photo, but it doesn’t look like that in real life… I think because when I took this photo the whole table was a bit askew from the floor boards?

It’s huge (7 feet long), but we figured if we were going to go through the trouble of building it, we would make one that would be large enough for our pre-Thanksgiving gathering and any other future events. And we definitely have plans to finish it somehow, but we don’t know how yet (stain? paint? two-tone? just seal it?). Still, it feels really great to look into the dining room and see the table that we freakin’ built! It’s definitely not perfect, but it’s sturdy and, if nothing else, comes with a good story attached to it.

Tagged , , ,

Refinishing a dining room table

I’m going to warn you right now, up front: This is not a story of success. It is not a story of “wow, that was so easy!”. It is definitely a failure. But it’s proof that things don’t always go as well as we hoped. So with that said …

Making such a huge amount of progress in the kitchen gave us a major confidence boost. Not only did we feel like we could tackle these projects, but we realized that we enjoyed doing it, and we definitely enjoyed the results. So we’re on a roll.

One thing that I’ve wanted to do for a while is something, anything, about our hand-me-down dining room table. It came  as part of a set from my late grandmother, all of which are an ugly, “speckled orange” color. It’s solidly built, and I definitely don’t want to toss it. But I don’t know the first thing about refinishing furniture. I thought about painting it (which is how I “dealt” with the matching buffets), but I wanted a natural wood finish. During one of my many just-browsing-the-internet moments at work (on my lunch break, of course. Never during work hours!), I noticed this table at Restoration Hardware:

Image from Restoration Hardware

It has a very similar shape & lines to my dining room table, so I thought “Hmm, this is probably what my table would look like if I stripped it!”. I had a vague memory of what the table looks like (as I hadn’t seen it in a while — it’s buried under displaced objects from our kitchen renovation), but I was certain if I stripped the finish and stain, I’d be left with a table like this one.

So on my way home, I stopped to get some eco-friendly stripper (Soy Gel Paint Remover). Then as soon as I got home, I uncovered the dining table, and started putting stripper all over it. But as I was doing it, I noticed the grain.

Here is my internal monologue as I was applying the stripper to the surface

“Hmm…. that’s not what I thought it would be”

“It’s got these curly patterns in it”

“Wait, is that maple?”

“There is no way this entire dining table is made out of quilted maple. That’s too fancy”

But even though I was feeling uneasy, I persevered with the application. It was only while Alex and I were out and about later, while the stripper was working, that the nebulous worry finally formed into a conclusion. The table must have a veneer.  I didn’t know how that would affect my plans, but I knew things weren’t looking good.

So after the stripper had worked for a few hours (and in another situation, where I wasn’t sure of failure, I would have let it sit longer to work more), we started using our scrapers and wire brushes to remove the gel. Sure enough, the tabletop was definitely a veneer. A fairly thick one, but still a veneer. Plus, by checking out the unfinished wood on the bottom of the table (which we should have done before attempting anything), it was clear that no matter what we did, we would never get to the light Restoration-Hardware color we were looking for. The wood was always going to be orange. (although that gives me an idea… can I bleach it? I will google this …)


You can see the pizza-slice-shaped pieces of veneer on the rounded ends. Not what we were hoping for. 

We were dejected and annoyed. Plus, we had a jacked-up looking table (we’re still going to try to rehabilitate it, but that will take another, more thorough application of stripper, and either re-staining it or painting it, so we’ve got some work ahead of us). And in 2 weeks, we have 7 people coming for a pre-Thanksgiving celebration, so we need a table ASAP.

And so, because of this botched attempt at refinishing, and our need for a table soon, we decided to build our own dining room table.

Tagged , , , ,